SSH certificates implementation
SSH certificates can greatly help security, but also can take some annoying administration away from the user in environments that have a high deployamnt rate, such as development environments. Who hasn't had the key change messages, had to edit the known_hosts file and then retry the operation, having to save the key again until the next deployment...
Login autometion using client cetificates works great and delivers additional security, but for developers the sigh of relief sounds when logging on to a newly deployed server just works, no questions asked (providing You use a valid certificate).
For SSH certificates to work, the following requirements must be met:
- A ca-vault implementaion is in place (like OpenBao or HashCorp Vault)
- ssh-signer is configured in the vault
- an approle is configured for signing requests from rhaap
- the vault-ca is added on all servers
- sshd options are configured on servers
- automation platform is correctly configured
Added security options
- limit the source address to login from (jump host or rhaap)
- limit the options enabled through ssh (terminal or tunneling)
- limit the users that can use this
Opensource hashicorp vault
Configure Openbao ssh-signer and server ssh
Create approle
implement ssh cert in rhaap
additional options:
Configure Signed SSH certificates
The signed SSH certificates is the simplest and most powerful in terms of setup complexity and in terms of being platform agnostic. By leveraging OpenBao's powerful CA capabilities and functionality built into OpenSSH, clients can SSH into target hosts using their own local SSH keys.
In this section, the term "client" refers to the person or machine performing the SSH operation. The "host" refers to the target machine. If this is confusing, substitute "client" with "user".
This page will show a quick start for this secrets engine. For detailed documentation on every path, use bao path-help after mounting the secrets engine.
Client key signing CA setup
Before a client can request their SSH key be signed, the OpenBao SSH secrets engine must be configured. Usually an OpenBao administrator or security team performs these steps. It is also possible to automate these actions using a configuration management tool like Chef, Puppet, Ansible, or Salt.
Signing key & role configuration The following steps are performed in advance by an OpenBao administrator, security team, or configuration management tooling.
Mount the secrets engine. Like all secrets engines in OpenBao, the SSH secrets engine must be mounted before use.
Note
the bao command is only availlable in the openbao container, for hashicorp this is the vault command.
To get access to the command line, log in to the container running openbao or hashicorp vault:
docker exec -it <container_name> /bin/sh
export VAULT_ADDR=http://127.0.0.1:8200
export VAULT_TOKEN=<token>
Set the environment variables above to avoid errors
$ bao secrets enable -path=ssh-client-signer ssh
Successfully mounted 'ssh' at 'ssh-client-signer'!
This enables the SSH secrets engine at the path "ssh-client-signer". It is possible to mount the same secrets engine multiple times using different -path arguments. The name "ssh-client-signer" is not special - it can be any name, but this documentation will assume "ssh-client-signer".
Configure OpenBao with a CA for signing client keys using the /config/ca endpoint. If you do not have an internal CA, OpenBao can generate a keypair for you.
$ bao write ssh-client-signer/config/ca generate_signing_key=true
Key             Value
---             -----
public_key      ssh-rsa AAAAB3NzaC1yc2EA...
If you already have a keypair, specify the public and private key parts as part of the payload:
$ bao write ssh-client-signer/config/ca \
    private_key="..." \
    public_key="..."
The SSH secrets engine allows multiple Certificate Authority (CA) certificates ("issuers") to be configured in a single mount. This feature is designed to facilitate CA rotation. When configuring a CA, one issuer is designated as the default - its operations will be used whenever no specific issuer is referenced during role creation. The default issuer can be changed at any time by either generating a new CA or updating it through the configuration endpoint, enabling seamless CA rotation.
Regardless of whether it is generated or uploaded, the client signer public key is accessible via the API at the /public_key endpoint or the CLI (see next step).
Add the public key to all target host's SSH configuration. This process can be manual or automated using a configuration management tool. The public key is accessible via the API and does not require authentication.
$ curl -o /etc/ssh/trusted-user-ca-keys.pem http://<your-vault-host>:8200/v1/ssh-client-signer/public_key

$ bao read -field=public_key ssh-client-signer/config/ca > /etc/ssh/trusted-user-ca-keys.pem
Add the path where the public key contents are stored to the SSH configuration file as the TrustedUserCAKeys option.
# /etc/ssh/sshd_config
# ...
TrustedUserCAKeys /etc/ssh/trusted-user-ca-keys.pem
Restart the SSH service to pick up the changes. After testing disable password and key logins for added security.
Create a named OpenBao role for signing client keys.
Because of the way some SSH certificate features are implemented, options are passed as a map. The following example adds the permit-pty extension to the certificate, and allows the user to specify their own values for permit-pty and permit-port-forwarding when requesting the certificate.
As an example, we will create a role for the ansible user
$ bao write ssh-client-signer/roles/aap-ansible -<<"EOH"
{
  "algorithm_signer": "rsa-sha2-256",
  "allow_user_certificates": true,
  "allowed_users": "ansible",
  "allowed_extensions": "permit-pty,permit-port-forwarding",
  "default_extensions": {
    "permit-pty": ""
  },
  "key_type": "ca",
  "default_user": "ansible",
  "ttl": "30m0s"
}
EOH
Client SSH authentication The following steps are performed by the client (user) that wants to authenticate to machines managed by OpenBao. These commands are usually run from the client's local workstation.
Locate or generate the SSH public key. Usually this is ~/.ssh/id_rsa.pub. If you do not have an SSH keypair, generate one:
$ ssh-keygen -t rsa -C "user@example.com"

Ask OpenBao to sign your public key. This file usually ends in .pub and the contents begin with ssh-rsa ....

$ bao write ssh-client-signer/sign/aap-ansible \
    public_key=@$HOME/.ssh/id_rsa.pub

Key             Value
---             -----
serial_number   c73f26d2340276aa
signed_key      ssh-rsa-cert-v01@openssh.com AAAAHHNzaC1...
The result will include the serial and the signed key. This signed key is another public key.
To customize the signing options, use a JSON payload:
$ bao write ssh-client-signer/sign/aap-ansible -<<"EOH"
{
  "public_key": "ssh-rsa AAA...",
  "valid_principals": "my-user",
  "key_id": "custom-prefix",
  "extensions": {
    "permit-pty": "",
    "permit-port-forwarding": ""
  }
}
EOH
Save the resulting signed, public key to disk. Limit permissions as needed.
$ bao write -field=signed_key ssh-client-signer/sign/aap-ansible \
    public_key=@$HOME/.ssh/id_rsa.pub > signed-cert.pub
If you are saving the certificate directly beside your SSH keypair, suffix the name with -cert.pub (~/.ssh/id_rsa-cert.pub). With this naming scheme, OpenSSH will automatically use it during authentication.
(Optional) View enabled extensions, principals, and metadata of the signed key.
$ ssh-keygen -Lf ~/.ssh/signed-cert.pub
SSH into the host machine using the signed key. You must supply both the signed public key from OpenBao and the corresponding private key as authentication to the SSH call.
$ ssh -i signed-cert.pub -i ~/.ssh/id_rsa username@10.0.23.5
On the bastion host, you can create a playbook to generate the certificates for the users there:
---

- name: Sign user ssh cert
  hosts: localhost
  gather_facts: false
  vars:
    ansible_host_key_checking: false
    approle: <approle_id>
    secret: <secret_id for the approle>
    sign_path: /v1/ssh-client-signer/sign/user
    url: 'http://<your openbao url>'

  tasks:

    - name: Logon
      ansible.builtin.uri:
        url: "{{ url }}/v1/auth/approle/login"
        method: POST
        headers:
          Content-type: "application/json"
        body_format: json
        body: |
          {
            "role_id": "{{ approle }}",
            "secret_id": "{{ secret }}"
          }
        timeout: 10
        validate_certs: false
      register: apptoken

    - name: Sign ssh key
      ansible.builtin.uri:
        url: "{{ url }}{{sign_path}}"
        method: POST
        headers:
          X-Vault-Token: "{{ apptoken['json']['auth']['client_token'] }}"
          Content-type: "application/json"
        body_format: json
        body: |
          {
            "public_key": "{{ lookup('file','~/.ssh/id_rsa.pub') }}"
          }
        timeout: 10
        validate_certs: false
      register: rsecret

    - name: Write signed cert to file
      ansible.builtin.copy:
        content: "{{ rsecret['json']['data']['signed_key'] }}"
        dest: "~/.ssh/id_rsa-cert.pub"
        mode: '0644'

    - name: Show result
      ansible.builtin.debug:
        msg: "Your certificatie is valid for 5 mins"
This playbook will generate a valid certificate for the ssh login on the machines and add this to the user public key.
This can be shared by all users on the bastion host by placing this in the /usr/local/bin directory and create the
following alias in /etc/bashrc:
alias signkey='ansible-playbook /usr/local/bin/sign_key.yml -i localhost'
Client key signing host setup
On every host the following actions must be performed to enable certificate based logins, this is for Rocky linux, so adapt for your flavour.
curl -o /etc/ssh/trusted-user-ca-keys.pem http://<your-vault-host>:8200/v1/ssh-client-signer/public_key
echo 'TrustedUserCAKeys /etc/ssh/trusted-user-ca-keys.pem' >>/etc/ssh/sshd_config
systemctl restart sshd
For Alpine linux ensure curl is installed and change the last line to service sshd restart.
Host key signing CA setup
For an added layer of security, we recommend enabling host key signing. This is used in conjunction with client key signing to provide an additional integrity layer. When enabled, the SSH agent will verify the target host is valid and trusted before attempting to SSH. This will reduce the probability of a user accidentally SSHing into an unmanaged or malicious machine.
Signing key configuration Mount the secrets engine. For the most security, mount at a different path from the client signer.
$ bao secrets enable -path=ssh-host-signer ssh
Successfully mounted 'ssh' at 'ssh-host-signer'!
Configure OpenBao with a CA for signing host keys using the /config/ca endpoint. If you do not have an internal CA, OpenBao can generate a keypair for you.
$ bao write ssh-host-signer/config/ca generate_signing_key=true
Key             Value
---             -----
public_key      ssh-rsa AAAAB3NzaC1yc2EA...
If you already have a keypair, specify the public and private key parts as part of the payload:
$ bao write ssh-host-signer/config/ca \
    private_key="..." \
    public_key="..."
Regardless of whether it is generated or uploaded, the host signer public key is accessible via the API at the /public_key endpoint.
Extend host key certificate TTLs.
$ bao secrets tune -max-lease-ttl=87600h ssh-host-signer
Create a role for signing host keys. Be sure to fill in the list of allowed domains, set allow_bare_domains, or both.
$ bao write ssh-host-signer/roles/hostrole \
    key_type=ca \
    algorithm_signer=rsa-sha2-256 \
    ttl=87600h \
    allow_host_certificates=true \
    allowed_domains="localdomain,example.com" \
    allow_subdomains=true
Sign the host's SSH public key.
$ bao write ssh-host-signer/sign/hostrole \
    cert_type=host \
    public_key=@/etc/ssh/ssh_host_rsa_key.pub
Key             Value
---             -----
serial_number   3746eb17371540d9
signed_key      ssh-rsa-cert-v01@openssh.com AAAAHHNzaC1y...
Set the resulting signed certificate as HostCertificate in the SSH configuration on the host machine.
$ bao write -field=signed_key ssh-host-signer/sign/hostrole \
    cert_type=host \
    public_key=@/etc/ssh/ssh_host_rsa_key.pub > /etc/ssh/ssh_host_rsa_key-cert.pub
Set permissions on the certificate to be 0640:
$ chmod 0640 /etc/ssh/ssh_host_rsa_key-cert.pub
Add host key and host certificate to the SSH configuration file.
# /etc/ssh/sshd_config
# ...

# For client keys
TrustedUserCAKeys /etc/ssh/trusted-user-ca-keys.pem

# For host keys
HostKey /etc/ssh/ssh_host_rsa_key
HostCertificate /etc/ssh/ssh_host_rsa_key-cert.pub
Restart the SSH service to pick up the changes.
Client-Side host verification Retrieve the host signing CA public key to validate the host signature of target machines.
$ curl http://127.0.0.1:8200/v1/ssh-host-signer/public_key

$ bao read -field=public_key ssh-host-signer/config/ca
Add the resulting public key to the known_hosts file with authority.
# ~/.ssh/known_hosts
@cert-authority *.example.com ssh-rsa AAAAB3NzaC1yc2EAAA...
SSH into target machines as usual.
Host key signing host config
For each host in your network, you want to automaticly verify the authenticity of the host key by signing the key through your CA.
You can use the following playbook to (re)sign the host certificates on all servers using ansible:
---

- name: Sign user ssh cert
  hosts: "{{ instance }}"
  gather_facts: false
  vars:
    ansible_host_key_checking: false
    vault_token: <your-vault-token>
    sign_path: /v1/ssh-host-signer/sign/hostrole
    url: 'http://<your-vault-host:8200'
    ansible_user: ansible
  become: true

  tasks:

    - name: Read the remote public key file
      ansible.builtin.slurp:
        src: /etc/ssh/ssh_host_rsa_key.pub
      register: remote_pub_key

    - name: Sign ssh key
      ansible.builtin.uri:
        url: "{{ url }}{{sign_path}}"
        method: POST
        headers:
          X-Vault-Token: "{{ vault_token }}"
          Content-type: "application/json"
        body_format: json
        body: |
          {
            "public_key": "{{ remote_pub_key.content | b64decode | trim }}",
            "cert_type": "host",
            "valid_principals": "{{ inventory_hostname }}"
          }
        timeout: 10
        validate_certs: false
      register: rsecret

    - name: Write signed cert to file
      ansible.builtin.copy:
        content: "{{ rsecret['json']['data']['signed_key'] }}"
        dest: "/etc/ssh/ssh_host_rsa_key-cert.pub"
        mode: '0644'

    - name: Set options in sshd_config
      ansible.builtin.blockinfile:
        path: /etc/ssh/sshd_config
        insertafter: EOF
        block: |
          HostKey /etc/ssh/ssh_host_rsa_key
          HostCertificate /etc/ssh/ssh_host_rsa_key-cert.pub

    - name: Restart sshd
      ansible.builtin.service:
        name: sshd
        state: restarted

    - name: Show result
      ansible.builtin.debug:
        msg: "Host certificate is signed"
create an inventory that lists all hosts you want signed and call the playbook:
ansible-playbook tools/sign_host.yml -i inventory.ini -e instance=all
Use AppRole authentication
The approle auth method allows machines or apps to authenticate with Vault-defined roles. The open design of AppRole enables a varied set of workflows and configurations to handle large numbers of apps. This auth method is oriented to automated workflows (machines and services), and is less useful for human operators. We recommend using batch tokens with the AppRole auth method.
An "AppRole" represents a set of Vault policies and login constraints that must be met to receive a token with those policies. The scope can be as narrow or broad as desired. An AppRole can be created for a particular machine, or even a particular user on that machine, or a service spread across machines. The credentials required for successful login depend upon the constraints set on the AppRole associated with the credentials.
Authentication Via the CLI The default path is /approle. If this auth method was enabled at a different path, specify auth/my-path/login instead.
$ vault write auth/approle/login \
    role_id=db02de05-fa39-4855-059b-67221c5c2f63 \
    secret_id=6a174c20-f6de-a53c-74d2-6018fcceff64

Key                Value
---                -----
token              65b74ffd-842c-fd43-1386-f7d7006e520a
token_accessor     3c29bc22-5c72-11a6-f778-2bc8f48cea0e
token_duration     20m0s
token_renewable    true
token_policies     [default]
Via the API The default endpoint is auth/approle/login. If this auth method was enabled at a different path, use that value instead of approle.
$ curl \
    --request POST \
    --data '{"role_id":"988a9df-...","secret_id":"37b74931..."}' \
    http://127.0.0.1:8200/v1/auth/approle/login
The response will contain the token at auth.client_token:
{
  "auth": {
    "renewable": true,
    "lease_duration": 2764800,
    "metadata": {},
    "policies": ["default", "dev-policy", "test-policy"],
    "accessor": "5d7fb475-07cb-4060-c2de-1ca3fcbf0c56",
    "client_token": "98a4c7ab-b1fe-361b-ba0b-e307aacfd587"
  }
}
Application Integration: See the Code Example section for a code snippet demonstrating the authentication with Vault using the AppRole auth method.
Configuration Auth methods must be configured in advance before users or machines can authenticate. These steps are usually completed by an operator or configuration management tool.
Via the CLI Enable the AppRole auth method:
$ vault auth enable approle
Create a named role:
$ vault write auth/approle/role/my-role \
    token_type=batch \
    secret_id_ttl=10m \
    token_ttl=20m \
    token_max_ttl=30m \
    secret_id_num_uses=40
Note: If the token issued by your approle needs the ability to create child tokens, you will need to set token_num_uses to 0.
For the complete list of configuration options, please see the API documentation.
Fetch the RoleID of the AppRole:
$ vault read auth/approle/role/my-role/role-id
role_id     db02de05-fa39-4855-059b-67221c5c2f63
Get a SecretID issued against the AppRole:
$ vault write -f auth/approle/role/my-role/secret-id
secret_id               6a174c20-f6de-a53c-74d2-6018fcceff64
secret_id_accessor      c454f7e5-996e-7230-6074-6ef26b7bcf86
secret_id_ttl           10m
secret_id_num_uses      40
Via the API Enable the AppRole auth method:
$ curl \
    --header "X-Vault-Token: ..." \
    --request POST \
    --data '{"type": "approle"}' \
    http://127.0.0.1:8200/v1/sys/auth/approle
Create an AppRole with desired set of policies:
$ curl \
    --header "X-Vault-Token: ..." \
    --request POST \
    --data '{"policies": "dev-policy,test-policy", "token_type": "batch"}' \
    http://127.0.0.1:8200/v1/auth/approle/role/my-role
Fetch the identifier of the role:
$ curl \
    --header "X-Vault-Token: ..." \
    http://127.0.0.1:8200/v1/auth/approle/role/my-role/role-id
The response will look like:
{
  "data": {
    "role_id": "988a9dfd-ea69-4a53-6cb6-9d6b86474bba"
  }
}
Create a new secret identifier under the role:
$ curl \
    --header "X-Vault-Token: ..." \
    --request POST \
     http://127.0.0.1:8200/v1/auth/approle/role/my-role/secret-id
The response will look like:
{
  "data": {
    "secret_id_accessor": "45946873-1d96-a9d4-678c-9229f74386a5",
    "secret_id": "37b74931-c4cd-d49a-9246-ccc62d682a25",
    "secret_id_ttl": 600,
    "secret_id_num_uses": 40
  }
}
Credentials/Constraints
RoleID
RoleID is an identifier that selects the AppRole against which the other credentials are evaluated. When authenticating against this auth method's login endpoint, the RoleID is a required argument (via role_id) at all times. By default, RoleIDs are unique UUIDs, which allow them to serve as secondary secrets to the other credential information. However, they can be set to particular values to match introspected information by the client (for instance, the client's domain name).
SecretID
SecretID is a credential that is required by default for any login (via secret_id) and is intended to always be secret. (For advanced usage, requiring a SecretID can be disabled via an AppRole's bind_secret_id parameter, allowing machines with only knowledge of the RoleID, or matching other set constraints, to fetch a token). SecretIDs can be created against an AppRole either via generation of a 128-bit purely random UUID by the role itself (Pull mode) or via specific, custom values (Push mode). Similarly to tokens, SecretIDs have properties like usage-limit, TTLs and expirations.
Pull and push SecretID modes
If the SecretID used for login is fetched from an AppRole, this is operating in Pull mode. If a "custom" SecretID is set against an AppRole by the client, it is referred to as a Push mode. Push mode mimics the behavior of the deprecated App-ID auth method; however, in most cases Pull mode is the better approach. The reason is that Push mode requires some other system to have knowledge of the full set of client credentials (RoleID and SecretID) in order to create the entry, even if these are then distributed via different paths. However, in Pull mode, even though the RoleID must be known in order to distribute it to the client, the SecretID can be kept confidential from all parties except for the final authenticating client by using Response Wrapping.
Push mode is available for App-ID workflow compatibility, which in some specific cases is preferable, but in most cases Pull mode is more secure and should be preferred.
Further constraints
role_id is a required credential at the login endpoint. AppRole pointed to by the role_id will have constraints set on it. This dictates other required credentials for login. The bind_secret_id constraint requires secret_id to be presented at the login endpoint. Going forward, this auth method can support more constraint parameters to support varied set of Apps. Some constraints will not require a credential, but still enforce constraints for login. For example, secret_id_bound_cidrs will only allow logins coming from IP addresses belonging to configured CIDR blocks on the AppRole.
Tutorial
Refer to the following tutorials to learn more:
AppRole Pull Authentication tutorial to learn how to use the AppRole auth method to generate tokens for machines or apps.
AppRole usage best practices to understand the recommendation for distributing the AppRole credentials to the target Vault clients.
User lockout
If a user provides bad credentials several times in quick succession, Vault will stop trying to validate their credentials for a while, instead returning immediately with a permission denied error. We call this behavior "user lockout". The time for which a user will be locked out is called “lockout duration”. The user will be able to login after the lockout duration has passed. The number of failed login attempts after which the user is locked out is called “lockout threshold”. The lockout threshold counter is reset to zero after a few minutes without login attempts, or upon a successful login attempt. The duration after which the counter will be reset to zero after no login attempts is called "lockout counter reset". This can defeat both automated and targeted requests i.e, user-based password guessing attacks as well as automated attacks.
Note
User lockout occurs early in request processing and may leak information about the validity or existence of valid, existing user account names.
The user lockout feature is enabled by default. The default values for "lockout threshold" is 5 attempts, "lockout duration" is 15 minutes, "lockout counter reset" is 15 minutes.
The user lockout feature can be disabled as follows:
It can be disabled globally using environment variable VAULT_DISABLE_USER_LOCKOUT. It can be disabled for all supported auth methods (ldap, userpass and approle) or a specific supported auth method using the disable_lockout parameter within user_lockout stanza in configuration file. Please see user lockout configuration for more details. It can be disabled for a specific auth mount using "auth tune". Please see auth tune command or auth tune api for more details. NOTE: This feature is available from Vault version 1.13 and is only supported by the userpass, ldap, and approle auth methods.
Configure RHAAP
Once you have your environment set up you need to add the Credentials to the External Secret Management System to allow Automation controller to look up the information when the credential is called (Which we will create later on)
Access the Automation controller Web UI and navigate to Resources > Credentials > New
Complete the form as follows:
Name - HashiVault SSH Credential Type - HashiCorp Vault Signed SSH Server URL - The URL of the HashiVault server along with the port AppRole role_id - The AppRole you created in Vault in the Environment setup section AppRole secret_id - The AppRole secret you created in Vault in the Environment setup section An example of how this will look when completed is in the screenshot below. Once happy click Save
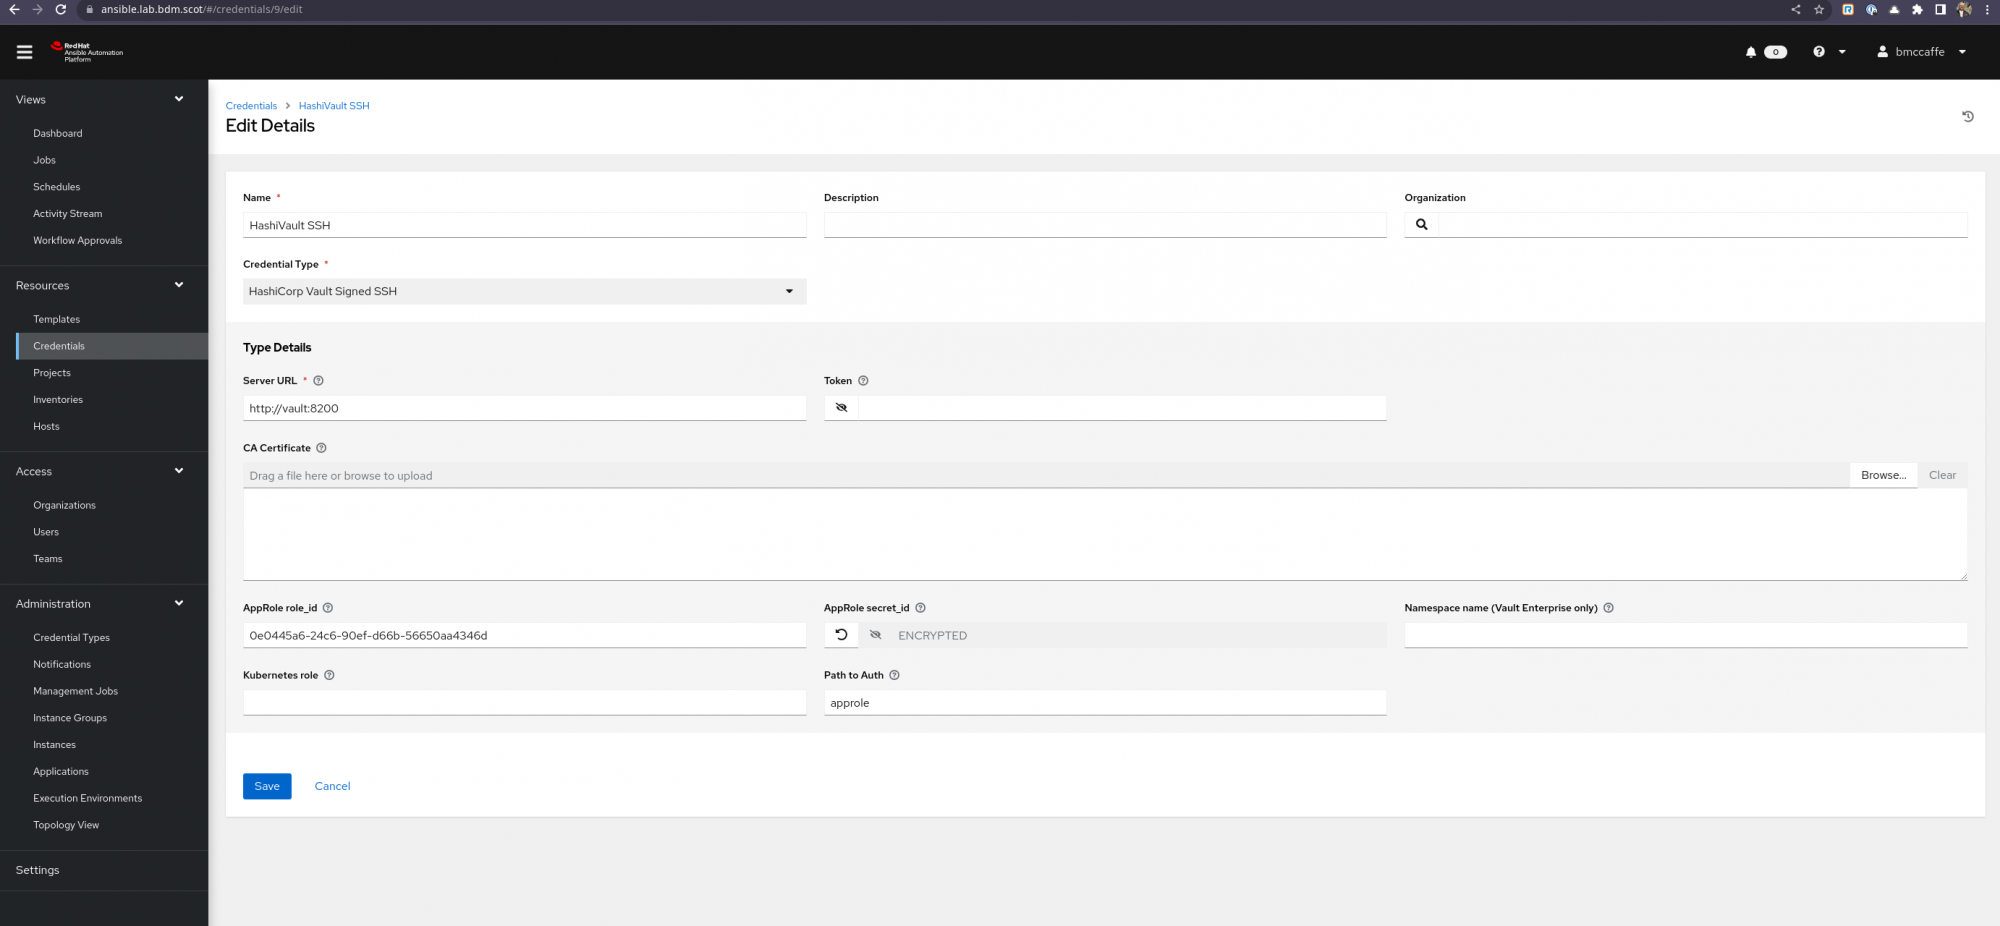
Credentials Edit Screenshot Credentials Edit Screenshot This has created our connection to HashiVault server however we need a Machine Credential for Ansible to use when connecting to machines as part of a playbook/template run.
Access the Automation controller WedUI and navigate to Resources > Credentials > New
Complete the form as follows:
Name - Hasivault SSH Cred Type - Machine Username - The SSH User you wish to SSH to the hosts as (In my example I have used vault-user) SSH Private Key - A private key created for this test with the ssh-keygen command on any RHEL host. Signed SSH Certificate - Use the HashiVault SSH Credential (You access this by pressing the key symbol on the right of the Signed SSH Certificate field. This will open a new dialog box which you complete:
Unsigned Public Key - The matching Public Key for the Private Key Provided above Path to Secret - ssh-client-signer (If you followed the Hashicorp Developer guide in the Environment setup section above this will be name name used, Adjust if your environment is different) Role Name - my-role (If you followed the Hashicorp Developer guide in the Environment setup section above this will be name name used, Adjust if your environment is different) Valid Principals - This should be the valid Principal(s) you wish to be passed to vault. A screenshot of what this dialog looks like completed is below. Once happy click Test and if the test is successful click Save
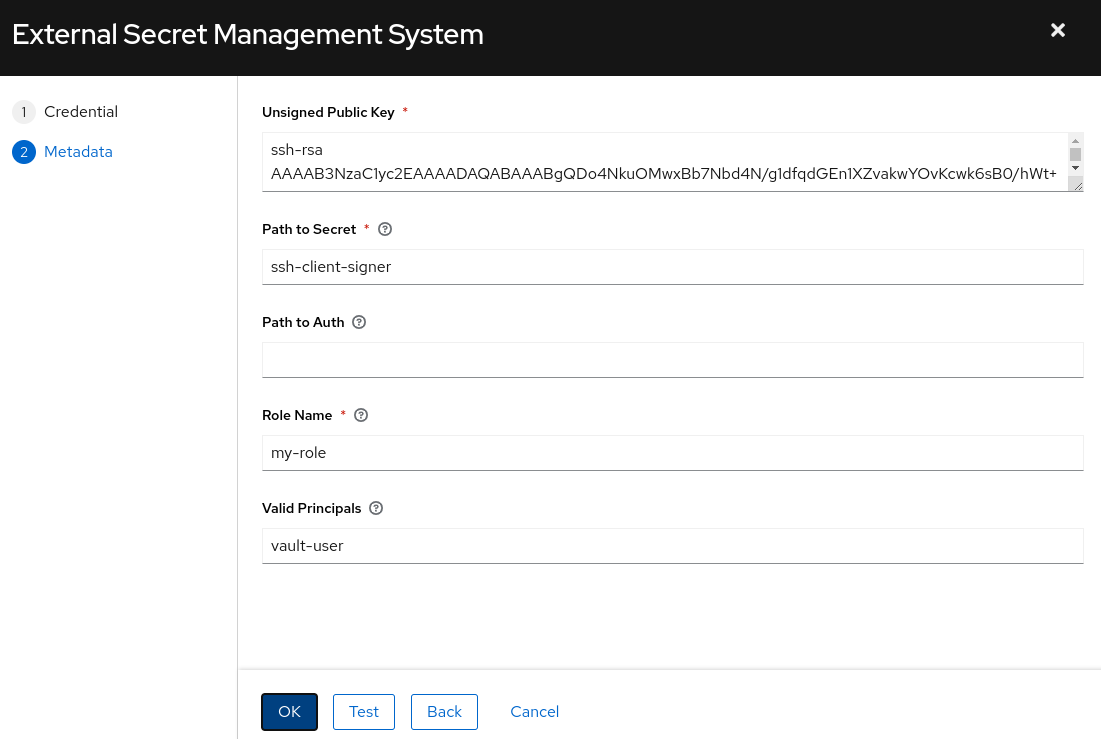
External Secrets Management Screenshot External Secrets Management Screenshot
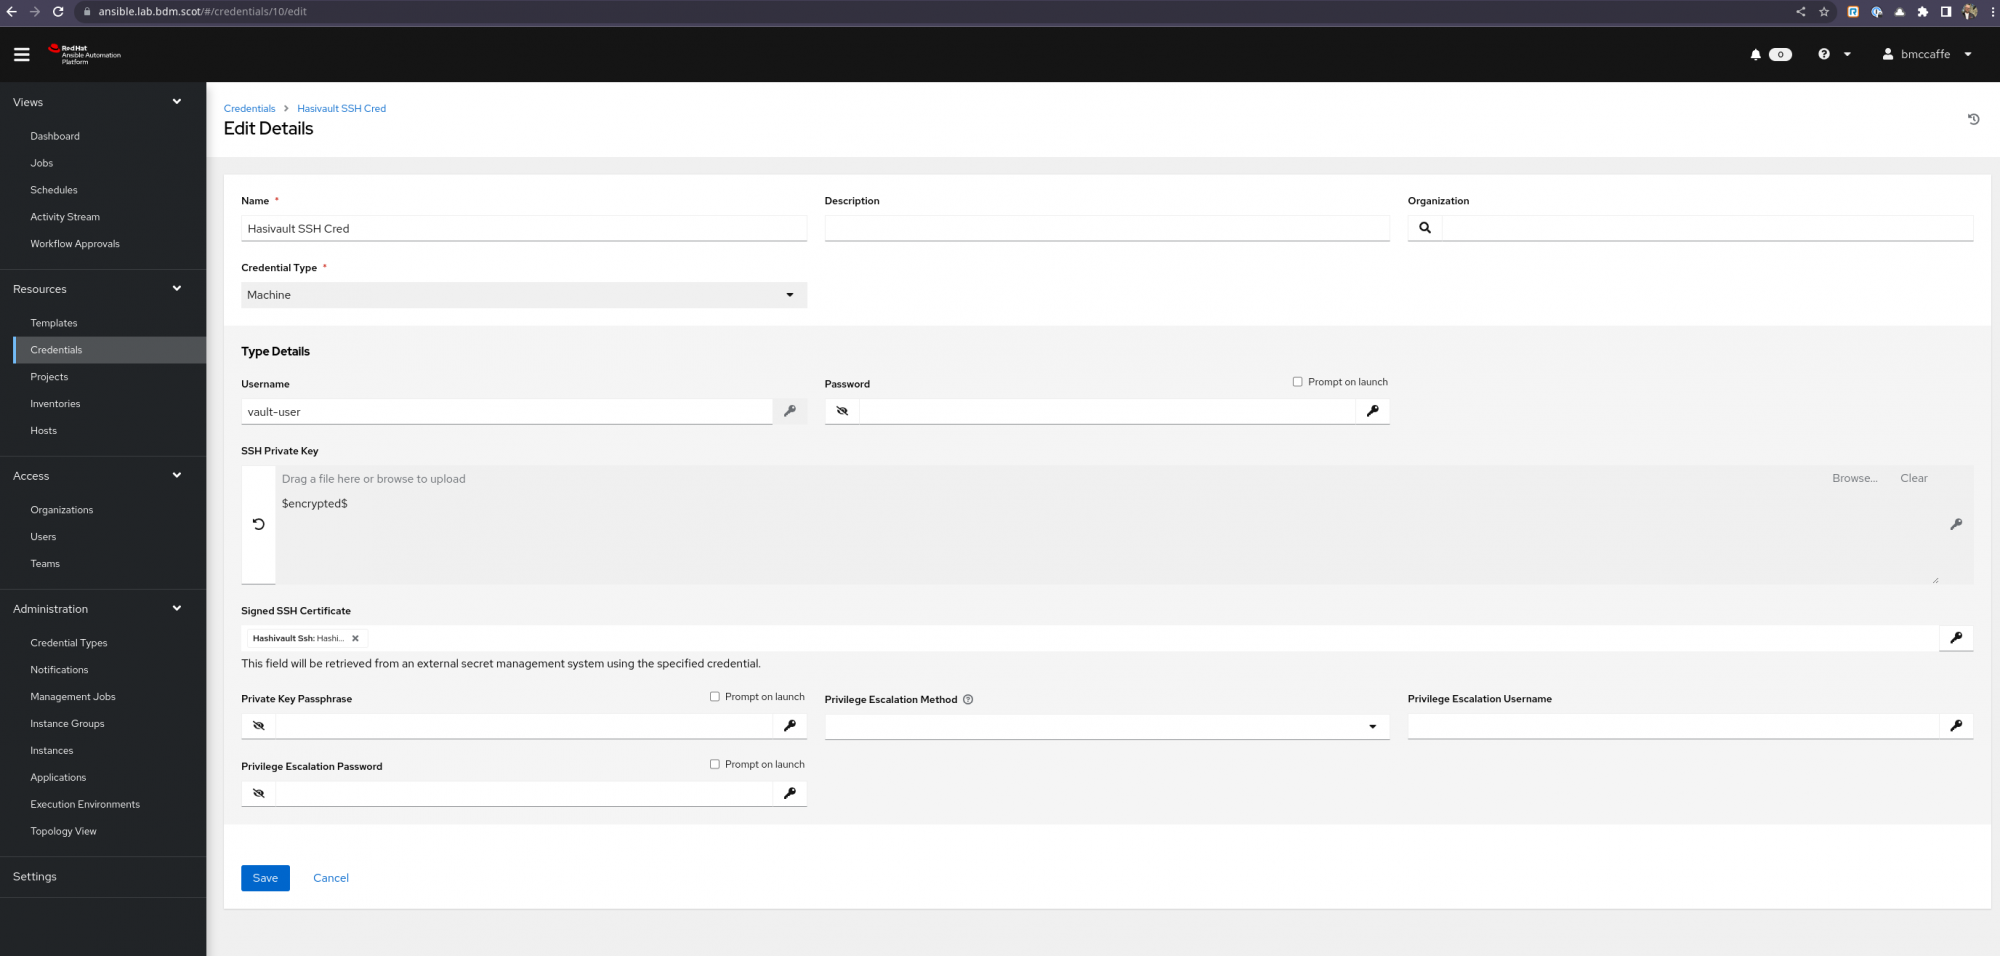
HashiVault Machine Credential Screenshot HashiVault Machine Credential Screenshot This is now all set up to use HashiCorp Vault with Signed SSH Credentials as machine credentials.
Set up a Job Template in Automation controller as normal and select the Machine Credential created above in my example called Hasivault SSH Cred and launch the templace.
The resulting Template Job run will complete sucessfully
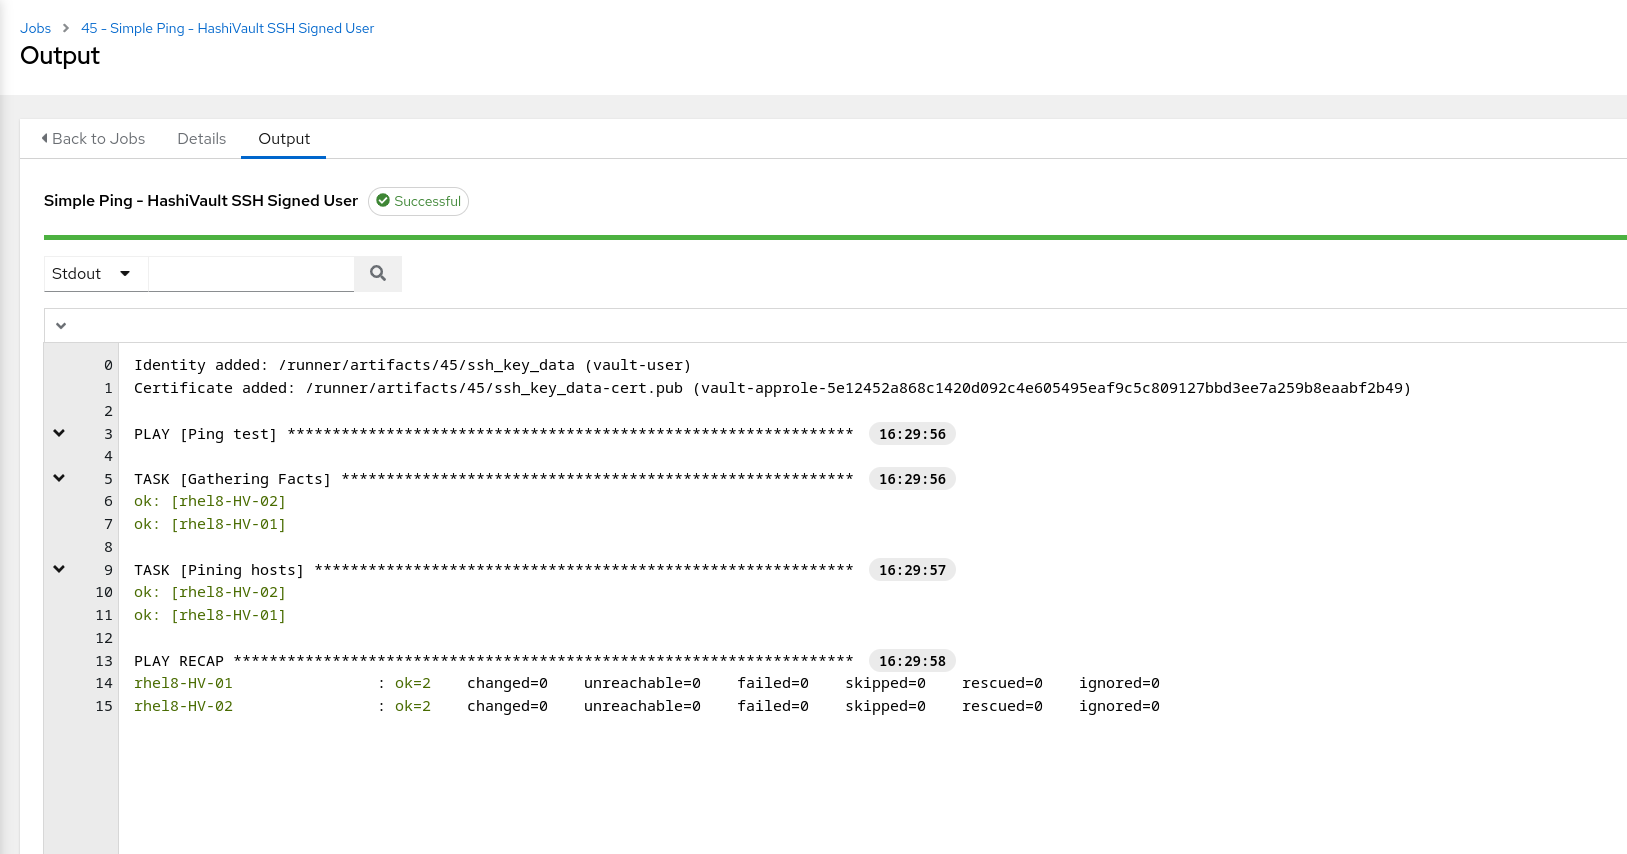
Ansible Template Job Run Screenshot Ansible Template Job Run Screenshot You can see from the Screenshot the signed key is automatically added when running the job and this is done dynamically at run time.